

The moment I realized my favorite shirt no longer fit, I knew I had two choices. I could stop wearing it or figure out how to make a shirt smaller without ruining the fabric or the shape I liked. That frustration is what pushed me to dive deeper into How to Make a Shirt Smaller? and test every method I could find, from shrinking to sewing to temporary hacks.
This article is based on my hands-on experience fixing oversized shirts at home. I have worked with cotton t shirts, button-downs, and thrifted finds that were close to fitting but not quite right. Some methods worked perfectly, while others taught me what to avoid.
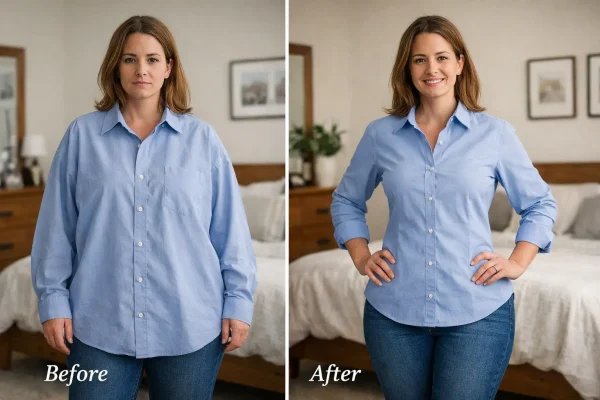
If your shirt feels baggy, long, or shapeless, this guide walks you through what actually helps. I will show you how to resize a T shirt, take in a shirt cleanly, and make oversized shirt fit better without guessing. Everything here is written for real people trying to fix real clothes.
💡 Key Takeaways
- Multiple Methods: You can make a big shirt smaller using shrinking, sewing, or temporary shaping techniques depending on your comfort level.
- Fabric Factor: The fabric type determines whether shrinking will work or if tailoring is the safer option.
- Fit Control: Learning how to take in a T-shirt improves fit without sacrificing comfort or movement.
- Small Adjustments: Minor changes often deliver better results than aggressive resizing.
- Method Choice: Choosing the right approach helps prevent permanent or irreversible mistakes.
Understanding Why Shirt Fit Changes Over Time
Shirts rarely stop fitting for just one reason. Fabric relaxes, washing habits change, and body proportions shift gradually. I noticed that shirts I loved started feeling loose around the waist even though the shoulders still fit.
A poor fit makes a shirt look sloppy, even if the fabric and color are great. Baggy sides, excess length, or oversized sleeves pull attention away from the rest of your outfit. Fixing fit restores balance without replacing the garment.
Once I started altering shirts instead of discarding them, my wardrobe became more wearable, and I began seriously researching How to Make a Shirt Smaller? in ways that actually preserved fabric and structure. It also made me more intentional about buying clothes that could be adjusted later.
Make a Big Shirt Smaller Using Shrinking Methods

Shrinking is usually the first method people try because it requires no sewing, and learning how to shrink a shirt works best when the fabric is made from natural fibers. I use this approach when a shirt is only slightly too big and made from natural fibers. Shrinking relies on heat to contract the fabric fibers.
The biggest mistake I made early on was shrinking too aggressively. Once fabric shrinks, you cannot reverse it, so patience is critical.
How to Shrink a Shirt That’s a Size Too Big
Start by boiling a large pot of water and turning off the heat. Submerge the shirt and let it soak for five to twenty minutes depending on how much shrinkage you want. I always check progress gradually rather than leaving it too long.
After soaking, wash the shirt on the hottest setting allowed by the care label, following the clothing care labeling rule to avoid damage. Dry it on high heat to set the new size. Try the shirt on before repeating the process.
Can Cotton Shirts Be Resized With Shrinking
Cotton responds well to heat because the fibers tighten when exposed to high temperatures, which is common among natural fibers. Shirts made from pure cotton shrink more evenly than blends. Pre-shrunk cotton will change less but still respond slightly.
Synthetic fabrics rarely shrink in a controlled way. I avoid shrinking polyester because it often warps rather than tightens.
Sew a Shirt Smaller for a Permanent Fit
When shrinking does not work or feels risky, sewing is the most reliable option. This is the method I use when I want the shirt to look intentional and professionally fitted. Sewing lets you alter a shirt to fit specific areas without changing everything.
You do not need advanced skills to start. Simple side seam adjustments make the biggest difference.
🎥 Making an Oversized Shirt Fit Better
This video demonstrates a simple, practical way to alter an oversized shirt so it fits closer to the body. It walks through taking in the sides and adjusting the overall shape using beginner-friendly sewing steps. Watching this helps visualize the resizing process before making permanent changes at home.
Step by Step Shirt Resizing at Home

Turn the shirt inside out and lay it flat. Place a shirt that already fits you well on top as a guide. Pin along the side seams, tapering gently toward the waist.
Sew along the pinned lines and trim excess fabric, leaving room for proper seam allowance adjustment, which is explained well in this seam allowance guide. Press the seams flat and try the shirt on before making further changes.
Take In Shirt Sides Without Ruining Shape
Taking in too much fabric is a common mistake. Shirts need ease to move naturally, especially across the chest. I always start with small adjustments and test the fit.
If the shirt pulls when you move, undo the seam and reduce the taper. A good fit skims the body rather than clinging to it.
How to Resize a T Shirt Without Distortion
T shirts stretch differently than woven shirts, so resizing requires care. I learned that preserving the original seam curve keeps the shirt from twisting after washing. Most t shirts look baggy because of width, not length.
I focus on adjusting the torso before touching sleeves.
Resize Shirt Sleeves Only When Necessary
Sleeves are easy to over-alter. If they are too wide, remove them first and taper slightly before reattaching. Always match the original curve of the armhole.
This takes time, but it prevents puckering and pulling. The result looks far better than forcing the sleeve to fit.
Fix a Baggy Shirt Using Temporary Solutions
Not every situation calls for permanent changes. I use temporary fixes when I need a shirt to fit better for a single day or event. These methods are quick and reversible.
They are also helpful if you want to test a shape before sewing.
How Do You Make a Shirt Tighter Without Sewing
One of the easiest methods is the coin and elastic trick. Place a coin inside the shirt where you want it tighter and wrap a rubber band around it from the outside. It creates a gathered effect that looks intentional.
Safety pins can also be used inside the side seams. Make sure they are secure and not visible through the fabric.
How to Downsize a Shirt Without Cutting
Tying a knot at the side or back instantly changes the silhouette. I often do this with oversized tees for a casual look. Fashion tape also helps create temporary folds near the waist.
These methods work best for short-term wear.
Improve Shirt Fit by Adjusting Length
Length affects how loose a shirt appears. A shirt that is too long exaggerates bagginess even if the width is correct. Shortening the hem often makes the shirt look fitted instantly.
I always test length changes before cutting.
Shorten Shirt Length Safely
Wear the shirt and fold the hem to your desired length. Mark it lightly, remove the shirt, and confirm the measurement twice. Hem using a simple stitch or hemming a t shirt tape.
This small change often has the biggest visual impact.
How to Make Oversized Shirt Fit Better Across Different Body Areas
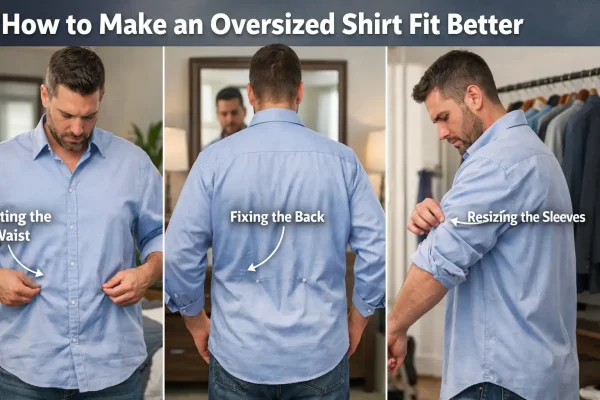
Not all oversized shirts fail in the same way. Some feel loose at the waist but tight at the shoulders, while others look fine standing still but bunch up when you move. I learned that fixing fit means identifying where the excess fabric actually lives instead of resizing everything at once.
Breaking the shirt down by body area helps avoid unnecessary cutting or sewing. This approach also prevents distortion that can make a shirt look altered instead of tailored.
How to Adjust Shirt Width Without Affecting Shoulder Fit
Shirt width issues usually come from excess fabric along the torso. I start by pinching the fabric at the side seams while wearing the shirt to see how much needs to come in. This shows whether the shirt needs subtle shaping or a more noticeable adjustment.
When adjusting width, I avoid touching the shoulder seams entirely. Altering shoulders requires advanced tailoring and often causes more problems than it solves. Keeping the original shoulder structure preserves how the shirt hangs.
How to Make a Shirt Smaller at the Waist Without Tightening the Chest
Waist fit is one of the most common complaints with oversized shirts. I focus on creating a gentle taper from the chest down rather than pulling fabric straight inward. This keeps the shirt comfortable while improving shape.
Taking in a shirt too aggressively at the waist can restrict movement. Small, gradual changes produce a cleaner result and feel better throughout the day.
Fixing Excess Fabric in the Back of a Shirt
Back fabric often balloons when a shirt is too large, especially around the lower spine. I address this by pinning excess fabric along the back seams or creating a subtle dart if needed. This removes volume without affecting the front.
This step is optional but effective for shirts that look fine from the front yet sloppy from behind. It is especially useful when tailoring thrifted shirts.
How to Resize Shirt Sleeves Without Changing Armholes
Sleeves contribute heavily to how oversized a shirt looks. I reduce sleeve width by tapering from the underarm toward the cuff while keeping the armhole intact. This avoids puckering and maintains mobility.
If the fit through the arms is fine, I leave it alone, especially after learning how to measure sleeve length for dress shirts correctly. Resizing sleeves should enhance balance, not introduce stiffness.
When to Stop Adjusting and Test the Fit
One mistake I made early on was making multiple changes before trying the shirt again. I now test fit after every adjustment, even small ones. Fabric behaves differently once sewn or pressed.
Stopping to test prevents overcorrection. It also keeps the shirt wearable even if you decide not to make further changes.
Tools You’ll Need for Shirt Resizing
You do not need many tools to start altering shirts. I keep a small kit ready so I do not rush or improvise poorly. Having the right tools makes resizing more precise and less stressful.
Is It Better to Shrink or Tailor a Shirt
This depends on fabric and how much smaller the shirt needs to be. Shrinking works best for minor changes in cotton shirts. Tailoring is better when fit problems are specific to the waist or torso.
I usually try shrinking first when possible, then move to sewing if needed, because mastering How to Make a Shirt Smaller? really comes down to choosing the right method for the fabric and fit issue. After trying both approaches, I found that how to make a shirt smaller successfully depends on whether the fabric can handle heat or needs precise shaping.
How to Make a Shirt Smaller at the Waist
Waist fit affects overall silhouette more than any other area. Taking in the side seams with a gentle taper creates a clean shape. Avoid pulling fabric too tightly toward the center.
Small adjustments here make oversized shirts look tailored.
How to Resize a T Shirt at Home Without Stress
The key is making one change at a time. I resize a t shirt by adjusting width first, then testing before touching sleeves or length. Rushing leads to mistakes that are hard to fix.
Patience saves shirts.
What to Do If a Shirt Is Slightly Too Big
If a shirt is only slightly loose, avoid aggressive methods. Minor side seam adjustments or a small hem reduction often solve the issue. Overcorrecting creates new problems.
Many shirts only need subtle changes.
Alter a Shirt to Fit Without Professional Help
Learning to tailor a shirt at home gives you control over fit. With basic stitching and careful measuring, you can fix most sizing issues. This approach also reduces waste.
Practice improves results quickly.
FAQs
1. Can you make a shirt smaller without sewing
Yes, shrinking, elastic hacks, safety pins, and fashion tape all work for temporary or minor adjustments.
2. What is the easiest way to make a shirt smaller
Shrinking a cotton shirt using hot water and high heat drying is usually the simplest method.
3. How do you reduce the size of a shirt evenly
Follow existing seam lines and adjust gradually to maintain balance across the body.
4. How to make a shirt smaller at the waist
Take in the side seams with a slight taper toward the waist and test the fit before final stitching.
5. Is it better to shrink or tailor a shirt
Shrinking works for small changes in cotton, while tailoring gives more control for larger fit issues.
Final Thoughts From Experience
Learning how to make a shirt smaller changed how I manage my wardrobe. Instead of settling for poor fit or buying replacements, I adjust what I already own. It saves money and extends the life of clothing.
The best method depends on your fabric, your patience, and how permanent you want the change to be. Start small, test often, and trust the process.